Hack to Spy: Building a Raspberry Spy Pi
- OTW
- Mar 28, 2019
- 4 min read
Updated: Dec 16, 2022
As nearly all of you know by now, the Raspberry Pi is a powerful and inexpensive computer that anyone can own and use. The Raspberry Pi is only slightly larger than a credit card and yet powerful enough to fulfill nearly any of your computing needs.

In this series, we will be building what I call a "Raspberry Spy Pi". This will be a Raspberry Pi built primarily for espionage and spying. These computers are so small and powerful that they are excellent for being used to spy. They are small enough to fit into very small spaces and remain relatively obscure, while powerful enough to be a remote spy unit. Since they can run a full version of Linux including Kali, they have all the capability of a hacking system when left remotely at another site.
Step #1 Getting Started
For this series, I will be using the latest version of the Raspberry Pi, Model 3. I like this model because it has Wi-Fi and Bluetooth built in, keeping our footprint very small with fewer external dongles. In addition, the Model 3 is faster at 1.2GHz and is 64-bit.

In most cases, the previous versions will work fine, albeit a bit slower, and maybe a bit less stealthy. Speed is not always critical in the spy game, but reliability is.
Step #2 Installing the Raspbian Image
As a remote spying device, the Raspbian operating system will be more than adequate. In later tutorials, we will install the Kali Linux OS on our Spy, but for now, let's use the standard Raspbian OS.
On the Raspberry Pi, the microSD is where all the data lives, including the operating system. As a result, the Pi will not boot without this card. For the projects we will be doing here, I recommend at least a 4gb microSD, but a larger one will give you more flexibility for other projects.

Step #3 Download the Raspbian Image
If your Pi came without an operating system, you will need to download and install it. You can find it at https://www.raspberrypi.org/downloads.

When you get to the Raspberry Pi web page, click on downloads at the top menu as seen above.
This will open the page below. Click on the Raspbian operating system.

That will open this page. Click on the Download button as it appears below.

The operating system image is about 1.3 Gb.
If you downloaded the zip file, you must first unzip it before we can proceed.
Step #4 Installing Raspbian to your SD Card
Once you have downloaded and unzipped the OS image, you will need to burn it to your SD card.
Windows Image Burn
If you are using Windows, try using the free Win32 Disk Imager. You can download it here.
To create the disk image:
1. Insert the SD card into the PC
2. Launch Win32 Disk Imager
3. Find the SD card among your devices and note it's letter
4. Click on the SD card icon.
5. Click the Write button to create the image.

Linux Image Burn
If you are using Linux, extract the Raspbian image to your home folder, then check which drives you have using the fdisk comand.
sudo fdisk -l
To burn the image to the SD card type assuming the SD card is sdb, we can type;
sudo dd if= <image file name> of=/dev/sdb
This is a relatively slow process, so be patient. When it finishes, type;
sudo sync
Now that we have the Raspbian image on the SD card, simply remove it from the slot on the PC and place it in the microSD slot on our Raspberry Spy Pi.
Step #5 Boot up your Spy Pi
When you boot up your Raspbian operating system on your Spy Pi, you will be asked to login. The default credentials are;
Login:pi
password:raspberry

Eventually, you should be greeted by a GUI like that above.
Step #6 Connecting to your Spy Pi
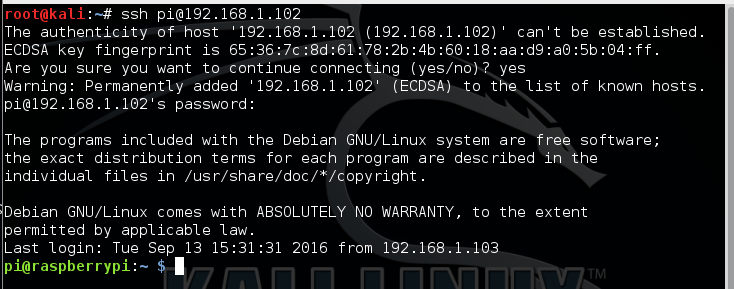
Since we will be using the Raspberry Pi as a Spy, we will need to connect to it remotely. We can do this by using SSH or Secure Shell.
If you are using Windows, you will need a SSH client on your Windows machine, such as PuTTY. You can download it at www.putty.org
If you are using Linux, it is even simpler. You can simply open a terminal and type;
kali > ssh pi@<IP address>

As you can see in the screenshot above, initially, the Pi SSH server will ask about the authenticity of the host you are connecting and once you answer "yes", it will continue and prompt you for a password. The default password on the Pi is "raspberry". If you have not changed it, enter it when prompted for the password. Now you are connected remotely to your Pi Spy!
Step #7 Installing a Camera
With the new Raspberry Pi Zero and the Raspberry Pi Model 3, we can install a tiny camera for spying. These cameras are capable of taking high-resolution pictures and video and are relatively inexpensive. You can purchase them for as little as $15 on Amazon. I will be using a 5MP camera that I paid about $15 for.
The cameras connect to the Pi's Camera Serial Interface (CSI) port as seen below. Open up your Raspberry Pi and connect the camera to the CSI.

When you have connected the camera, it should look something like that below.

Now that your Raspberry Spy Pi is up and running, equipped with a camera and you are connecting to it remotely, we are almost ready to use it as a Spy.
In the next few tutorials in this series, I will show you how to set up your Spy Pi to take high resolution pictures and video and record audio from your Spy Pi!